ffmpeg: Convert DCP to Quicktime

DCPs (or Digital Cinema Packages) are a fairly specialised form of distributing films and video for digital cinema. The emphasis of this format is on high-resolution, and high-quality – supporting up to 4k films encoded using the JPEG2000 codec.
In the vast majority of cases you would want to take your finished film, and convert it TO a DCP for distribution to cinemas, film festivals and so on. However, in a few instances I’ve had a need to reverse that conversion.
Now, I should make it clear that this process described here is only for unencrypted/unprotected DCPs. Clearly this process isn’t for converting a blockbuster feature films to H.264 for your home movie collection. I’ve just found it extremely useful when preparing content for our various film festivals, particularly when we need to create our awards ceremony or showreels promoting the film schedule, and where no other HD copy of the film is available.
Converting a DCP to a more common video format, such as Quicktime ProRes, is a very simply one-step process, but it involves some navigating of DCP folders and crazy filenames. A typical DCP folder will usually contain files that look something like this:

The ASSETMAP, VOLINDEX and .xml files are all used to describe the content, and help the digital cinema systems import, index and play back the films in the correct way. But what we’re really interested in are the two .mxf files.
You’ll notice two files ending in “_vid.mxf” and “_aud.mxf”. These are the video and audio streams that we’ll be using to convert to Quicktime. In the example above, you’ll notice that those two files begin with “jp2k_” and “wav_” respectively. This tells us that the video is in the JPEG2000 format, and the audio in the standard, uncompressed WAV format.
The beautiful thing about ffmpeg is that we now no longer need to worry about what those formats are, or indeed what colourspace the source material is in. ffmpeg will detect, and automatically convert for us.
(Yes, that’s correct: The latest version of ffmpeg will automatically convert the XYZ colourspace to RGB!)
Now, down to business:
- Open Terminal or the command prompt on your computer
- Navigate to the DCP folder you want to convert.
- Now run ffmpeg with these settings:
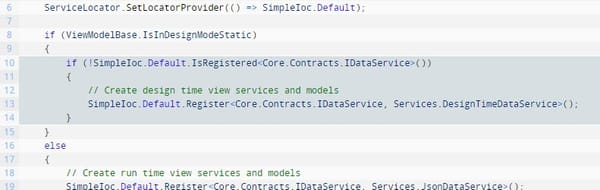
ffmpeg -i "filenamefor_vid.mxf" -i "filenamefor_aud.mxf" -c:v prores -c:a copy "outputFilename.mov"
- … and now be patient. Decoding JPEG2000 and doing an XYZ->RGB colour conversion is a slow process!
The above command will convert the DCP using the ‘prores’ codec, and will simply copy the audio data. The reason we don’t have to pass in any other settings is that ffmpeg always try to do the right thing. In this case, ffmpeg has spotted the colourspace of the DCP is XYZ:

… and that the format we’re trying to convert to only supports the RGB (or in this case, YUV 4:2:2) colourspace:

So ffmpeg fills in the gaps, and applies a colour conversion. Clever, huh?
There’s a lot this command doesn’t do, however. It doesn’t perform any scaling or frame-rate conversion. The aim is primarily to convert the DCP to a format that most editing systems will understand.
The other main caveat with this method is the conversion process, particularly the colourspace part, is fairly rough. It’s enough to get you out of a hole at the 11th hour during a film festival, but it’s not something you’d want to use as part of your day-to-day workflow.
But hopefully this post is enough to get you started.
Update (23rd June 2014): ProRes Encoding Notes
This post was only meant as a proof of concept, rather than a step by step guide – but it’s worth pointing out a few extra things:
The Apple ProRes 422 codec used in the example above is not necessarily the best format for maintaining the highest fidelity within the RGB colourspace. A better choice would be ProRes 4444, which is capable of storing 10-bit RGB colour values at full resolution. While the file sizes would be larger than the ProRes 422 format, you would still benefit from the flexibility and editing performance you get from the ProRes codec.
ffmpeg’s ProRes encoder doesn’t support ProRes 4444 (yet) … but a variant of it does. You’ll need to use this command if you want to generate ProRes 4444 files:
ffmpeg -i [filenamefor_vid.mxf] -i [filenamefor_aud.mxf] -c:v prores_kostya -pix_fmt yuv444p10 -c:a copy outputFilename.movAlternatively, if you want to stick with ProRes 422 but would prefer to use a specific ProRes profile (i.e Proxy, LT, SQ or HQ), then use this command:
ffmpeg -i [filenamefor_vid.mxf] -i [filenamefor_aud.mxf] -c:v prores -profile:v X -c:a copy outputFilename.mov… and replace the ‘X’ that follows ‘profile:v’ with the ProRes profile of your choice:
- 0 = Proxy
- 1 = LT
- 2 = SQ (Default)
- 3 = HQ
Encoding H.264 Viewing Copies
Another valuable use case for this procedure is in the creation of lower quality viewing copies, rather than high-quality intermediates for editing.
H.264 is a superb and versatile codec that is supported on all modern computer platforms, as well as tablets and phones.
Converting for H.264 couldn’t be easier:
ffmpeg -i [filenamefor_vid.mxf] -i [filenamefor_aud.mxf] -c:v libx264 -pix_fmt yuv420p -profile slow -crf 21 -ac 2 outputFilename.mp4You can even scale the DCP down to a PC / iPad friendlier size by adding a scale filter:
ffmpeg -i [filenamefor_vid.mxf] -i [filenamefor_aud.mxf] -c:v libx264 -pix_fmt yuv420p
  -vf "scale=-1:720" -profile slow -crf 21 -ac 2 outputFilename.mp4
This filter will scale down to 720p (ish) resolution.
Both of the above examples assume stereo is good enough for PC viewing, but there are plenty of examples out there to help you with advanced audio manipulation.
Audio Channel Mapping
Finally, check out the comment from William Isaac below. He’s spotted a problem when simply coping the audio stream from INTEROP DCPs, in that the channel mapping does not match that of the Dolby 5.1 standard mapping. He’s included an ffmpeg command that automagically remaps the audio during the encoding process.